Activate Cisco IOU License in GNS3
Introduction: GNS3 is a powerful network simulation tool used by networking professionals for
testing and learning purposes. One of its features is the ability to run Cisco IOU (IOS on Unix) images for
virtualizing Cisco routers and switches. However, to use Cisco IOU images legally, you need to activate a
license. In this article, we’ll guide you through the process of activating a Cisco IOU license in GNS3 using
Putty.
Step 1: Open Putty.exe
Putty is a terminal emulator that allows you to connect to remote systems via SSH. Open Putty on your local
machine to establish a connection to the GNS3 VM.
Step 2: Obtain IP Address and Login Credentials
Get the IP address of the GNS3 VM from the GNS3 interface. You’ll also need the username and password to access
the VM.

Step 3: Connect to GNS3 VM using Putty
Enter the IP address of the GNS3 VM in the “Host Name” field of Putty. Click “Open” to establish the SSH
connection.
Step 4: Provide Username and Password
When prompted, enter the username and password for the GNS3 VM. The default credentials are typically “gns3” for
both the username and password.
Step 5: Select Shell and Press Enter
Once logged in, select the shell option from the menu and press Enter to access the command line interface of
the GNS3 VM.
Step 6: Download Cisco IOU Keygen Script
Execute the following command to download the Cisco IOU Keygen script:
wget http://www.ipvanquish.com/download/CiscoIOUKeygen3f.py
Step 7: Check Downloaded File
Run the “ls” command to list the files in the current directory. Verify that the CiscoIOUKeygen3f.py file is
present.
Step 8: Execute Keygen Script
Run the following command to execute the Cisco IOU Keygen script:
python3 CiscoIOUKeygen3f.py

Run Get License
Step 9: Verify Output
After running the script, execute the “ls” command again to ensure that the iourc.txt file has been generated.
Step 10: View License Information
Use the “cat iourc.txt” command to view the contents of the iourc.txt file. Copy the text displayed in the
terminal.
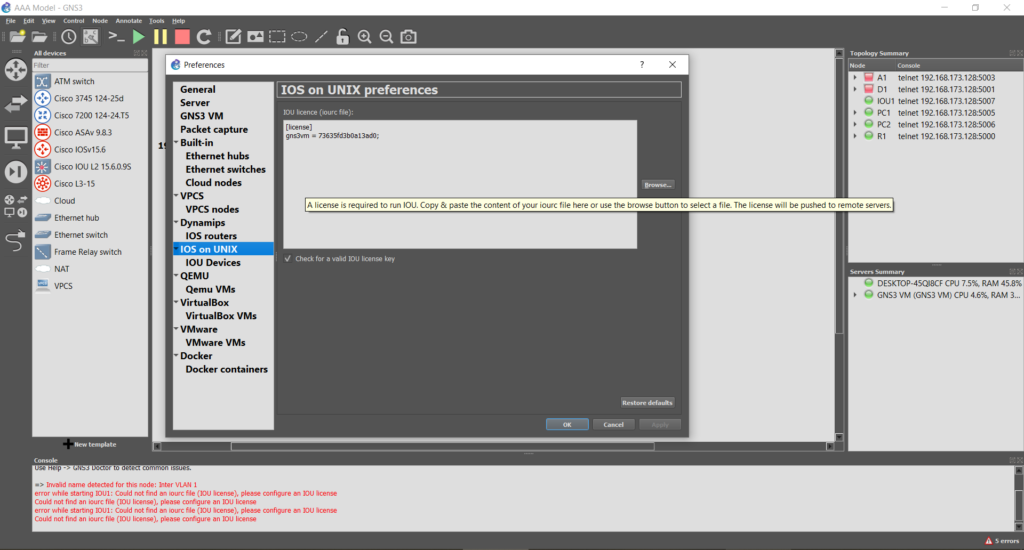
Step 11: Configure GNS3 Preferences

Apply Cisco IOU License
Open GNS3 and navigate to Edit > Preferences. Go to the “IOS on Unix” section and paste the copied text into
the appropriate field. Click “Apply” and then “OK” to save the changes.
Conclusion: By following these step-by-step instructions, you can easily activate a Cisco IOU
license in GNS3 using Putty. This allows you to legally use Cisco IOU images for network simulation and testing
purposes in your GNS3 environment.
gns3@gns3vm:~$ ls
gns3@gns3vm:~$ wget http://www.ipvanquish.com/download/CiscoIOUKeygen3f.py
gns3@gns3vm:~$ ls
CiscoIOUKeygen3f.py GNS3 iourc.txt
gns3@gns3vm:~$ python3 CiscoIOUKeygen3f.py
gns3@gns3vm:~$ cat iourc.txt
[license]
gns3vm = 73635fd3b0a13ad0;
gns3@gns3vm:~$


